
A bloated Squarespace website led to one of my most unusual redesign projects


You might suppose this is the story of a clever, customized solution built with Wordpress or Drupal. It is not. It is the story of an entirely bespoke content management system.
The word “bespoke” might elicit budgetary panic, but this project’s solution was surprisingly simple. A large team of costly developers was not needed. Only a standard web hosting account – with a bit of PHP and SQL – were required. With minimal web development experience, anyone can punch above their weight and build a tailored solution that churns out thousands of pages. This is not a project that attempts to reinvent the wheel. It is a laser-focused solution that performs a single task better than more versatile commercial products. (If you too would like to give it a try, skip to the development section for the code.)
How Did I Set About Creating a Customized CMS?
It all began when a commercial service could no longer accommodate a growing company website. Sugarloaf – a company that promoted large consumer events – had a problem. With the recent addition of hundreds of new exhibitor profile pages, Sugarloaf’s Squarespace site was in danger of exceeding the service’s one thousand page limit. It was decided that these profile pages needed to be hosted elsewhere.
I was tasked with finding a new solution to build hundreds of profile pages for Sugarloaf’s exhibitors. I would need to analyze how these pages were being utilized, and how they might be improved. I would need to provide the ability for contributors and freelance writers to edit the pages – as they had with the existing website. I would have to accomplish all of this expeditiously and without spending a fortune.
User Experience
Little analysis was required to prove the value of the site’s many profile pages. A key persona – a web visitor planning a trip to the festival – would typically view many profile pages. The pages also performed relatively well with organic search. That said, visitors from organic search almost never translated to an easily measurable return, by way of an event ticket purchase.
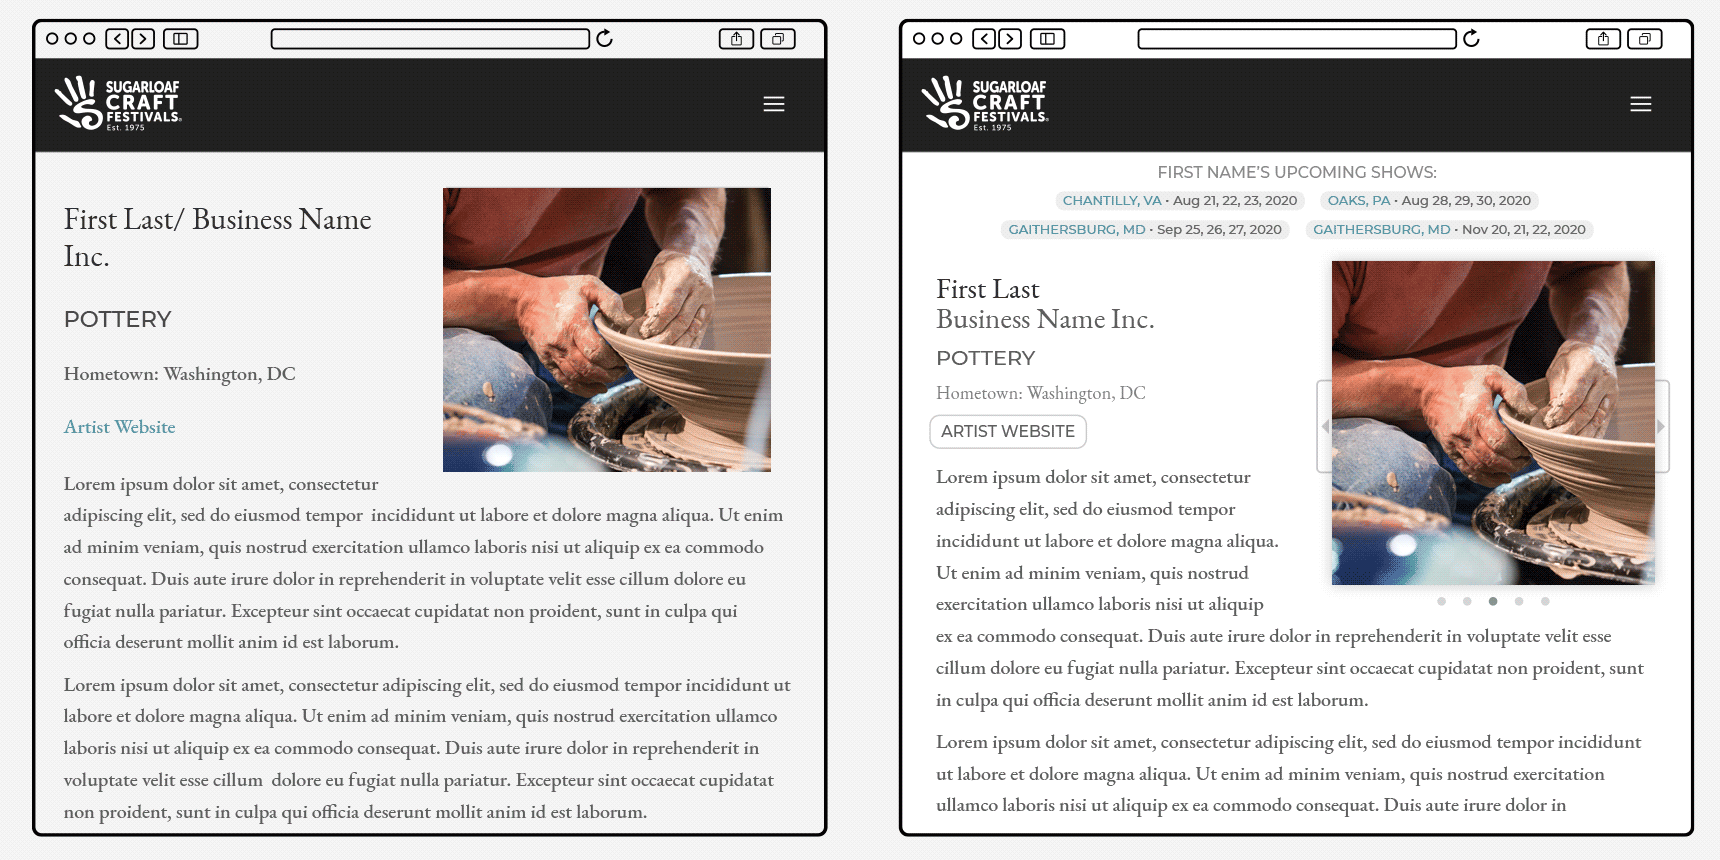
When functioning as an entry point, why might these profile pages fail to deliver ticket sales? Admittedly, selling event tickets from organic search is a tough business. The events are at a specific location and on a specific date. Visitors are from everywhere and visits occur at anytime. None the less, it was easy to see the problem. Users were not provided a useful path to upcoming event pages. If a visitor wanted to find an exhibitor at a particular show, they would need to manually search through various event pages. To improve the user’s journey through the website, each profile would need to display the exhibitor’s upcoming show schedule.
With a portion of Sugarloaf’s website remaining on Squarespace, the profile page redesign would not be an opportunity to deliver something radically different. I also did not want to add any cruft to pages that had a clear and logical focus. I settled on addressing only two additional design considerations.
Visitors requested that the exhibitor pages show more images. I decided that the simplest solution was the addition of an image carousel. The carousel could accommodate any number of images within a single block. It need not burden the freelance writers with image placement and layout.
Next, I paid special attention to how the pages would appear on mobile devices. Any modern CMS offers baked-in responsive design. Usually, that involves hiding a sidebar and collapsing the layout down to just one column on narrow screens. I am not always happy with these default behaviors and the Squarespace website was no exception. A tall image would expand to ridiculous dimensions when screens narrowed to the one-column breakpoint. I chose to constrain the height and width of each image to a square frame.
Displaying the upcoming show schedule on narrow screens required a custom approach. On large screens, it functioned best as a sidebar. As the schedule delivered the all important path to a possible ticket sale, it needed to remain prominent on all devices. The schedule could not be hidden or relegated to the bottom of the page. I decided to reduce the schedule into compact “buttons” on narrow screens.

A Refined User Interface
I began this project – determined that whatever CMS I chose – I would have greater customization options. I wanted this to be an opportunity to improve typography and spacing issues associated with a strict template system, with just a few predefined text styles. I focused on the show schedule section – insuring functionality at a variety of sizes. Beyond that, I focused on how text might be abbreviated for display on compact screens. I chose abbreviations for locations and dates that kept text on a single line –without scaling fonts down to tiny sizes.
Choosing a New Service
Various aims of this project were in conflict. When working with hundreds of pages, some degree of automation is important. The services that offered easy-to-use editors did not offer automation. The marquee feature of my redesign was to be the addition of customized schedules on each page. What service might allow that? It occurred to me that the only way to achieve all goals, was to develop a custom solution.
Development Lite
Building a bespoke CMS need not be difficult. The magical thing about this particular jaunt beyond the realm of UI/UX design, was that it did not require challenging development work. It involved relatively little code. It is the sort of project any designer who has dabbled with Javascript or PHP might tackle.
Most designers are familiar with one of the popular open source content management systems like Wordpress or Drupal. Both are written in PHP and create pages using information stored in a SQL database. My bespoke CMS project worked in much the same fashion.
The Process
Strip away all but the fundamentals and the project appears less formidable. My project had just one basic page layout. With that layout (a template), I needed to build a page for each exhibitor. The basic structure of each page was the same, with customized areas (template regions) where exhibitor data appeared.

Create Thousands of Pages Quickly
If you have an existing database or spreadsheet, you might already have what you need to start building pages. Sugarloaf had a database containing most of the information that would appear on each profile page – it just needed to be utilized. Building a page for each row or record in a database is easy. Essentially, it is just a matter of looping through rows, inserting data into a template and generating a page.
Templates
I began by building my new exhibitor profile page, and created a standard HTML file. Once satisfied with the design, areas where customization would occur were replaced with regions defined by double curly braces. For the sake of simplicity, the following example reduces a page to little more than a heading displaying a first and last name. The regions could contain anything – not just short bits of text. (For example, my script inserted a large block of code into the schedule region.)
<!doctype html>
<html>
<head>
<meta charset="UTF-8">
<title>{{lastName}}, {{firstName}}</title>
</head>

<body>
<h1>This Page Was Customized for {{firstName}} {{lastName}}</h1>
</body>
</html>
I had the good fortune of stumbling upon a lovely bit of code to insert data in the template file. (Sadly, the original page where the code appeared no longer exists.) You will not find a more elegant and compact solution to process templates. The class “Templater” will insert your data into a file – with regions defined by {{double curly braces}}. If curly braces do not suit your needs, just edit the values used in the public function.
<?php
//------------------------------
//How to Use Templater
//1.) Create a new object of class “Templater”
//    Example:
//    $myTemplater = new Templater();
//
//2.) Set the values to insert into your template page
//    Pass values in the format,
//    $myTemplater->set([the field name], [the variable data])
//    Example:
//    $myTemplater->set("firstName", $insertThisFirstName);
//    $myTemplater->set("lastName", $insertThisLastName);
//
//3.) Construct the new page by providing the path to your template.
//    Your template must contain variable regions within double curly braces.
//    Example (Template Regions):
//    <title>{{lastName}}, {{firstName}}</title>
//    Example (Construct new page/ Process the template):
//    $theNewPage = myTemplater->process("template.php");
//
//4.) Templater returns the result as a string.
//    ($theNewPage in the above example)
//    Use PHP's file_put_contents to save your file.
//    Example:
//    file_put_contents ( '/home/myaccount/mywebsite.net/myNewPage.php', $theNewPage )
//------------------------------

class Templater
  {//BEGIN Templater Class
    function __construct()
    {
       $this->templateVarNames = array();
       $this->templateVarValues = array();
    }

    public function set( $var, $value )
    {
       $this->templateVarNames[] = "{{" . $var . "}}";
       $this->templateVarValues[] = $value;
    }

    function process( $file )
    {
       $template = file_get_contents($file);
       $processed_template = str_replace($this->templateVarNames,$this->templateVarValues,$template);

       return $processed_template;
    }
  }//END Templater Class

//------------------------------

?>
Loop Through Your Data
My project involved a SQL database and multiple tables. It also largely operated with data exported from a Microsoft Access database. The idea was that Sugarloaf could largely maintain their data as they had for decades. A periodic export from MS Access would keep the website up to date. Content not included in the Access Database – the biographies written by freelance writers – was maintained in a separate table. (That avoided the possibility of accidentally deleting the biographies during an import.)
Needs vary from project to project. You might have existing data and no need for an online editor. To simplify the project, you could construct your pages with a CSV file. (Virtually any spreadsheet app ever created will export in the CSV format.) The following code loops through each row in a CSV file placed on your web server. PHP has a built-in function to process CSV files; however, it does not store them in an associative array. I have included a few compact lines of code (source) which allow you to reference data in each row by column name. Your exported CSV, would need to include those column names in the first row.
<?php
//------------------------------
//Loop Through a CSV File and Build Pages for Each Row
//(Use with "Templater" from previous example.)
//------------------------------

//Settings
$csvPath = 'myCSV.txt'; // Location of your CSV file
$tplPath = 'myTemplate.html'; // Location of your TEMPLATE file
$outPath = ''; // Location of directory for OUTPUT file -- empty to save in same directory as script

//Associative Array Stored in $a from CSV
//First row assumed to contain column names to define array
$f=fopen($csvPath,'r');$h=fgetcsv($f);for($a=[];$r=fgetcsv($f);$a[]=array_combine($h,$r));fclose($f);

//Loop through rows from the CSV file
foreach ($a as $row) {
  $myTemplater = new Templater();
  $myTemplater->set("firstName", $row['firstName']);
  $myTemplater->set("lastName", $row['lastName']);

  //set newFileName to "last_first.html" -- restricting to alphabetic characters
  $newFileName = preg_replace("/[^A-Za-z ]/", '', ($row['lastName'] . $row['firstName'])).'.html';

  //save new file constructed from template and row data
  file_put_contents ( ($outPath . $newFileName) , $myTemplater->process($tplPath) );

}//End foreach

?>
Looping through rows in a SQL database is roughly the same process. You will need to setup a web database if you plan on building an editor. How you go about that process depends on your web hosting provider. If you have a standard Linux host, chances are you can easily create SQL users and passwords with “cPanel.” Once privledges are created, you may setup tables with your PHP scripts. I recommend a resource like w3schools.com for more information. Within cPanel, you also should have access to a utility called “phpMyAdmin” that allows you to create and edit your tables with a GUI.
<?php
//------------------------------
//Loop Through a SQL Database and Build Pages for Each Row
//(Use with "Templater" from previous example.)
//------------------------------


//Get database credentials from a "safe" directory outside web root
//ini text file formatted as:
// ; ******************************
// ; SQL Account Information
// ; Read Only Permissions
// ; ******************************
// username = "yourUserName";
// password = "yourPassword";
// database = "yourDatabase";
//

$arySql = parse_ini_file("/home/user/notPublic/sql.ini");
$username=$arySql["username"];
$password=$arySql["password"];
$database=$arySql["database"];

//Open a new connection to the MySQL server
$linkToDB = mysqli_connect('localhost', $username, $password, $database);

$query = "SELECT `firstName`, `lastName` " .
         "FROM `exhibitors` ";

$result=mysqli_query($linkToDB, $query);

//Get Associative Array
$a = mysqli_fetch_all($result, MYSQLI_ASSOC);

// Free result set
mysqli_free_result($result);

mysqli_close($linkToDB);

//Loop through rows from the SQL file
foreach ($a as $row) {
  $myTemplater = new Templater();
  $myTemplater->set("firstName", $row['firstName']);
  $myTemplater->set("lastName", $row['lastName']);

  //set newFileName to "last_first.html" -- restricting to alphabetic characters
  $newFileName = preg_replace("/[^A-Za-z ]/", '', ($row['lastName'] . $row['firstName'])).'.html';

  //save new file constructed from template and row data
  file_put_contents ( ($outPath . $newFileName) , $myTemplater->process($tplPath) );

}//End foreach

?>
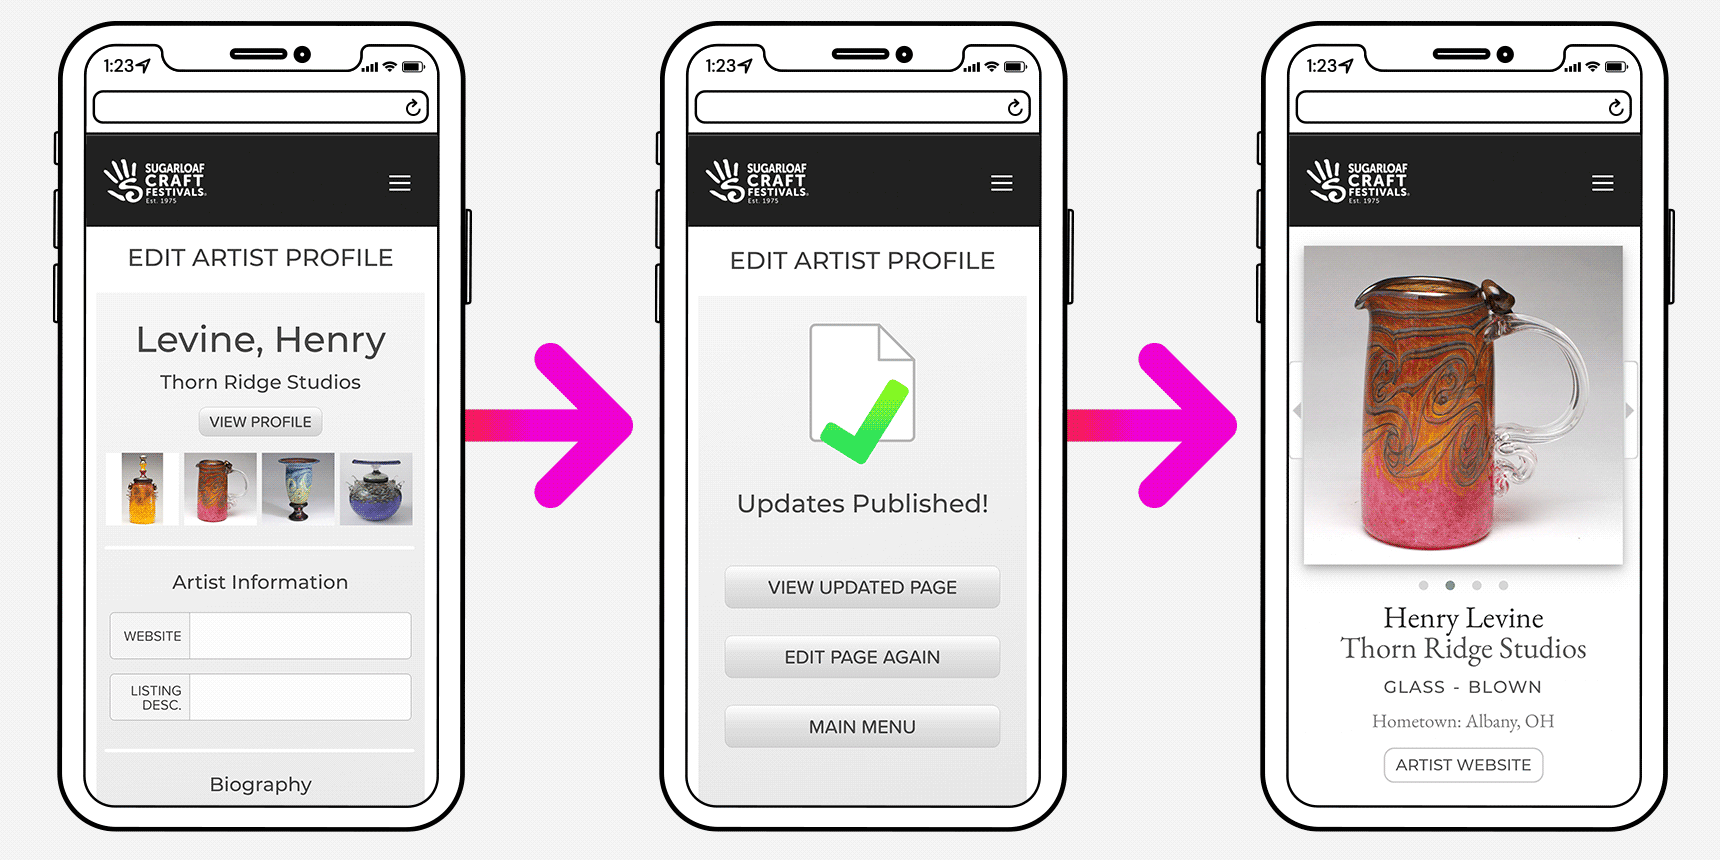
The Editor
If your work largely focuses on UI/UX design, building the bespoke CMS editor presents a conundrum. Your natural impulse is to design a beautiful interface that accommodates the user’s every need. The more spectacular your design, the tougher your development work. You might easily design a project that you cannot deliver. Much as I would like to share a tiny snippet of code that would allow you to build something ambitious, you will certainly need many lines of custom code. I generally tackle projects like this by dreaming big, then pairing things down to the basics. Build something simple, but allow room to grow or lay a foundation for greater things.
The Sugarloaf project needed to provide contributors an easy way to write and edit exhibitor biographies. They had previously worked with Squarespace and I had some apprehension about delivering a largely inferior experience. Developing something that rivaled a commercial WYSIWYG editor was out of the question. Having focused on web visitors and customers, I realized I did not fully appreciate what was important to the website contributors. I needed to understand their process.
Building a custom editor can have advantages – even without utilizing the full suite of modern web technologies. The very polished Squarespace interface, was not actually serving the needs of contributors. Locating one profile among the hundreds of exhibitor profiles was a surprisingly inefficient process. Squarespace listed all pages in a slow-scrolling sidebar that could not be sorted. Writers had to fiddle with setting names, links and categories in prescribed heading and text styles. As I considered the needs of the contributors, I was confident that I could make their job easier.
Forms
You can build a very basic editor with just one form. As my project took advantage of an existing database, my form focused on just a few additional items required to build the exhibitor profile. Two actions should be performed upon form submission. First, you will need to update the SQL database used to build your pages. Second, your edits should be published. You will reuse some of the code that processes your template file. Rather than loop through all of your pages, you need only process the edited page.
Processing Forms
I have only provided sample code processing a simple form post. The example reads three values from a post – “pageName,” “firstName” and “lastName” – and updates a SQL record. If “pageName” does not exist, a new record is created. For simplicity, past examples had only variables for a first and last name. Without delving too far into database design, records in your tables should have have a value that uniquely identifies each record. For that matter, each page you create on your web server needs a unique filename. With the previous example, when building a page for a second exhibitor with the same first and last name the second instance would overwrite the first. You generally want to avoid using names or values that might change for indexes and keys. That said, search engines likely favor a page named “john_doe.html” over a page named by numeric index. How you go about naming pages largely depends on your specific project. To keep this example simple, I will assume that the submitting form has created a page name value that is unique.
<?php

if(isset($_POST["pageName"])):
  //assume valid post if form post supplies "pageName"
  //use with session/password validation


  //Get database credentials from a "safe" directory outside web root
  //ini text file formatted as:
  // ; ******************************
  // ;   SQL Account Information
  // ;   Read+Write Permissions
  // ; ******************************
  // username = "yourUserName";
  // password = "yourPassword";
  // database = "yourDatabase";
  //
  //
  $arySql = parse_ini_file("/home/user/notPublic/sqlWrite.ini");
  $username=$arySql["username"];
  $password=$arySql["password"];
  $database=$arySql["database"];

  //Open a new connection to the MySQL server
  $linkToDB = mysqli_connect('localhost', $username, $password, $database);

  //Prevent code injection

  $pageNameEsc = mysqli_real_escape_string($linkToDB, $_POST["pageName"]);
  $firstNameEsc = mysqli_real_escape_string($linkToDB, @$_POST["firstName"]);
  $lastNameEsc = mysqli_real_escape_string($linkToDB, @$_POST["lastName"]);


  //`pageName` is defined as a PRIMARY key in for table `exhibitors`
  $query = "INSERT INTO `exhibitors` "
          ."SET "
            ."`pageName` ='$pageNameEsc', "
            ."`firstName`='$firstNameEsc', "
            ."`lastName` ='$lastNameEsc' "
          ."ON DUPLICATE KEY "
          ."UPDATE "
            ."`firstName`='$firstNameEsc', "
            ."`lastName` ='$lastNameEsc' ";


  $result=mysqli_query($linkToDB, $query);

  mysqli_close($linkToDB);


endif; //end isset pageName


?>
Results
This project delivered more than anyone anticipated, at less cost than anyone estimated. It is not an example of my most flashy design work. There are not any novel or especially fun interface elements. None the less, I carefully considered every interaction and feature. I created something that functioned better not only for web visitors, but also for the contributors who wrote the exhibitor biographies.
I have never had a project evolve in such an unexpected way. It was a pleasant surprise to have a simple redesign transform into custom solution that eliminated a lot of tedious work.
I have attempted to keep this story concise. Should anyone want to build their own bespoke CMS, I should share a few final thoughts. I have not addressed security, search engine optimization or image creation.
Additional Considerations
Security
Although the purpose of my bespoke CMS project is to take data and construct publicly accessible pages, I would be remiss if I did not mention anything on the subjet of security. I should also state that I am not a security expert and assume no responsibility for any shared code or any security advice.
If you build an editor, you will want to control who uses it. If you simply want to construct a bunch of files from a CSV, you need not worry adding password protected pages. You will want to remove or disable the script that builds pages from your CSV. It is probably unlikely that someone would find the script on your web server; however, it is wise to take precautions. (Repeatedly running a script that writes thousands of pages would adversely effect the performance of your website.)
The web is full of PHP login scripts. What script you use, depends on your needs. I used a script that creates a “session.” Each secured page checks for an active login session. Some scripts store passwords as well as login data within a SQL database. Simple solutions might include the login credentials directly in the PHP script (less secure). If you have several users, I would strongly recommend having separate login credentials for each user. You might also considered adding a "last modified by" column to your data table(s).
Search Engine Optimization
Building a custom solution affords great opportunities to to tackle search engine optimization. I hate redundant data entry. Customizing SEO information on Squarespace involved entering information in a secondary settings panel for each page. That often resulted in maintenance issues and outdated page descriptions. You can include SEO fields on your custom edit form. You might also a generate great default metadata and descriptions based on information from other columns.
Your bespoke CMS can easily automate sitemap generation. While not all believe a sitemap is valuable these days, why not include one if the cost is just a few lines of code in your script? Just add the following lines to the script that processes your data. The example generates a basic sitemap, including only url location. You could easily add the traditional lastmod, changefreq and priority tags. Inclusion of that additional data might be a quaint practice from a bygone era when web crawlers were more primitive and the SEO industry was far smaller. (For example, this data is not currently included on Apple’s sitemap.)
<?php

//BEGIN YOUR SITEMAP WITH THESE LINES:
$strSiteMap ='<?xml version="1.0" encoding="UTF-8"?>' . PHP_EOL .
             '<urlset xmlns="http://www.sitemaps.org/schemas/sitemap/0.9">' . PHP_EOL;


//FOR EACH PAGE YOU CREATE, ADD THESE LINES TO YOUR SITEMAP:
//(PLACE WITHIN LOOP THAT CONSTRUCTS PAGES)
$strSiteMap.='  <url>'.PHP_EOL.
             '    <loc>https://yoursite.com/'.$a['pageName'].'</loc>' . PHP_EOL.
             '  </url>'.PHP_EOL;


//END YOUR SITEMAP WITH:
$strSiteMap.= '</urlset>';


//SAVE YOUR SITEMAP
 file_put_contents ( 'sitemap.xml', $strSiteMap);


?>
Images
You might be wondering why I have not shared information about the images appearing on the Sugarloaf profile pages. I benefited from an existing database that stored images for each exhibitor. The work I did to make those files available on Sugarloaf’s website would not have much use to anyone.
That said, you probably do not want to store images directly in a SQL database. It is better to make use of the file system and store a reference to the image (a filename). My solution only stored an image count. Images were saved according to a naming convention based on the name of the page (Example: “img/pageName_imageNo.jpg”). Obviously, if your layout displays captions, you will need a more complicated solution.
I made use of Photoshop’s batch processing capabilities to size and format the images used on the Sugarloaf website. Creating an editor that allows the upload of images will require some extra work. Although responsive layouts and high resolution screens have largely ended the day of sizing to exact display size, I would anticipate that some submitted images would need resizing. PHP has built-in capabilities to resize or reformat images (ImageMagick).